Overview
This article explains how to view your website before pointing your DNS to DreamHost by editing the hosts file on your computer.
An alternative option is to view your site at DreamHost using a temporary domain.
Background
A hosts file is a text file used by your computer that changes where your computer searches for a specific website. For example:
- when you visit a website, your computer follows the public DNS records of the internet.
- when you edit the hosts file, you control the DNS records your computer uses.
This allows you to view a site on your DreamHost server when the public DNS records are pointed to another company.
How to update your hosts file
The following sections describe how to locate and update your hosts file on different operating systems.
Windows 10/11
On most Windows systems, you can find the hosts file in the following directory:
C:\Windows\System32\drivers\etc
Notepad is a basic text editing program that is already installed on Windows. To open the hosts file with Notepad:
- Open the Start menu.
- Start typing the word 'notepad', and it will display the icon.
- Right-click on the Notepad option and choose Run as administrator.
You may receive a pop-up message titled User Access Control asking, Do you want to allow this app to make changes to your PC? Click Yes. This opens a blank Notepad file.
- Click the File > Open... menu option in the top left of this blank file.
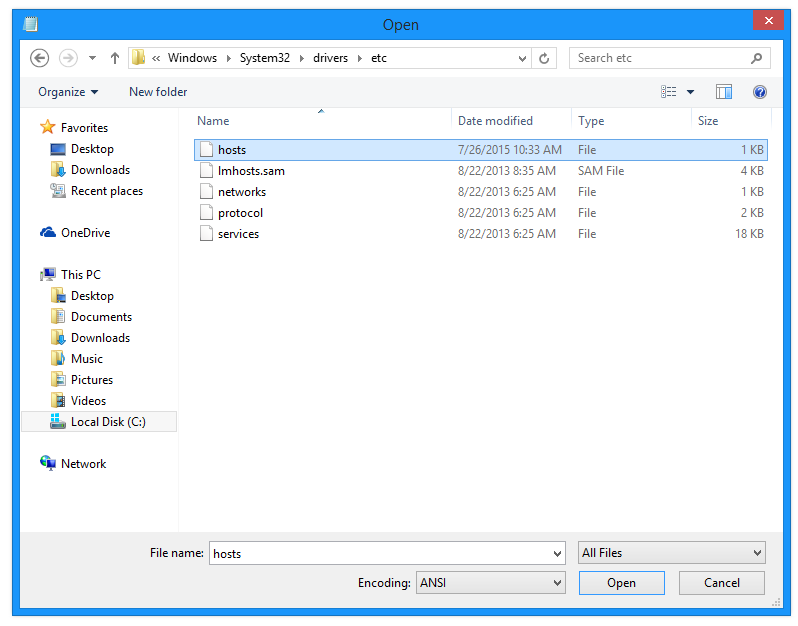
- Navigate to This PC in the Explorer window and then to the C:\Windows\System32\drivers\etc directory.
- Choose the hosts file and click Open. You may need to change the Text Documents (*.txt) in the lower right to All Files in the dropdown list.
- Add your DreamHost site IPs followed by the domain at the bottom of the file.
xxx.xxx.xxx.xxx example.com
xxx.xxx.xxx.xxx www.example.com - Save the file.
- Flush your computer's DNS to ensure the new settings update.
- Restart your browser and visit your domain.
You can now view your site as it appears on your DreamHost server. Once you point your DNS to DreamHost, you can then remove these lines.
macOS
- Launch Terminal by pressing command (⌘) + spacebar, which opens the search box.
- Type the word terminal.
- Press the return key or click the terminal icon.
- Type the following into your terminal to edit this file:
[server]$ sudo nano /private/etc/hosts
- Enter the administrator password.
- Add your DreamHost site IPs followed by the domain at the bottom of the file.
xxx.xxx.xxx.xxx example.com
xxx.xxx.xxx.xxx www.example.com - Save and close the file when finished to return to your terminal prompt.
- Close the Terminal when finished.
- Flush your DNS to ensure the new settings update.
You can now view your site as it appears on your DreamHost server. Once you point your DNS to DreamHost, you can then remove these lines.
Linux
On most Linux-based systems:
- The hosts file can be located in the /etc/ directory.
- The hosts file is usually called hosts.
- The full path is /etc/hosts.
The steps to edit and save the file are the same as the macOS instructions above.
WordPress Professional Services migrations
This section explains how to view your WordPress site (at DreamHost) if it was migrated by the Professional Services Team. This section only applies to non-DreamPress migrations.
Locate and edit your computer's hosts file as described above. With this migration process, you must add a third line of text for the MySQL server. For example, if your site were example.com, you would add these lines to the bottom of your hosts file:
111.111.111.111 example.com
111.111.111.111 www.example.com
222.222.222.222 mysql.example.com
Making further changes to your site
Please refrain from changing anything that may alter the site's look or behavior since the Professional Services Team must be able to compare the migrated site (at DreamHost) to the live site (at your current host).
How to view your site
This section explains how to compare your DreamHost site to your live website.
Confirming the 'hosts' file is working
You can confirm you are loading the migrated site from DreamHost's servers if you can load the following page:
- https://example.com/quickstart.html
Viewing your public site through a proxy
Once your hosts file is updated, your computer displays how your site appears at DreamHost. If you want to also view your current (public) site, you must use a proxy website. The proxy site will use your site's public DNS (not your local hosts file) to view the site at your current hosting company.
Viewing your site using a hosts file and a proxy site allows you to compare both versions of your site side-by-side.
