Overview
The WP Mail SMTP plugin lets you send email from any address you choose, including non-DreamHost addresses like Gmail, by routing outgoing mail through a mail server instead of the web server. Routing mail this way avoids issues with Sender Domain Policy and Spoofing.
Gmail address
These instructions explain how to configure this plugin using a DreamHost email address created in the panel.
See this article instead if you want to use a Gmail address to send from your WordPress site.
Installing the WP Mail SMTP plugin
Before proceeding, make sure the plugin is installed and active.
DreamHost WordPress installs
The plugin is installed automatically when you install WordPress using the DreamHost WordPress installer in the panel. To activate it in your dashboard, navigate to the Plugins > Installed Plugins page and click the Activate link under WP Mail SMTP.
Other install types
If you used another method to install WordPress, you must manually install the plugin.
- Navigate to Plugins > Add New in the left pane in the WordPress dashboard.
- Search for wp-mail-smtp. It can also be found here.
- Click the Install button, then Activate.
How do I configure the plugin?
There are two options to configure this plugin:
Option 1 — Using the Setup Wizard
The Setup Wizard is a quick way to configure your settings. If the Setup Wizard did not open during installation, you can open it on the plugin's settings page.
- Log in to your WordPress site.
- Navigate to the WP MAIL SMTP page.
- Click the Launch Setup Wizard button.
- Click the Let's Get Started button. A list of SMTP Mailers appears.
- Select Other SMTP and click Save and Continue.
- Enter the following SMTP settings.
- SMTP Host - smtp.dreamhost.com
- Encryption - TLS
- SMTP Port - 587
- Enable Authentication - toggle this option
- SMTP Username - add your DreamHost email address
- SMTP Password - enter the password for your DreamHost email address. You can also reset it if necessary.
- From Name - enter a name you'd like to appear as being sent FROM
- From Email - enter the email you wish to send FROM
- Click Save and Continue. Proceed through the next prompts depending on your preferences or if you're using the Pro version.
-
Click Skip this Step or Save and Continue.
The final page checks your configuration. When the check completes, a success message displays to confirm your email is configured.
After testing, you may see a DMARC warning. Your email will still function without it, but it's recommended you configure DMARC to further authenticate email.
Option 2 — Manually configure on the settings page
- Log in to your WordPress site.
- Navigate to the WP MAIL SMTP > General page.
- Fill in the following fields:
- From Email - enter the email you wish to send FROM
- Force From Email - check this box
- From Name - enter a name you'd like to appear as being sent FROM
- Force From Name - check this if you wish to force the FROM name
- Return Path - check this box
- Choose Other SMTP under the Mailer section.
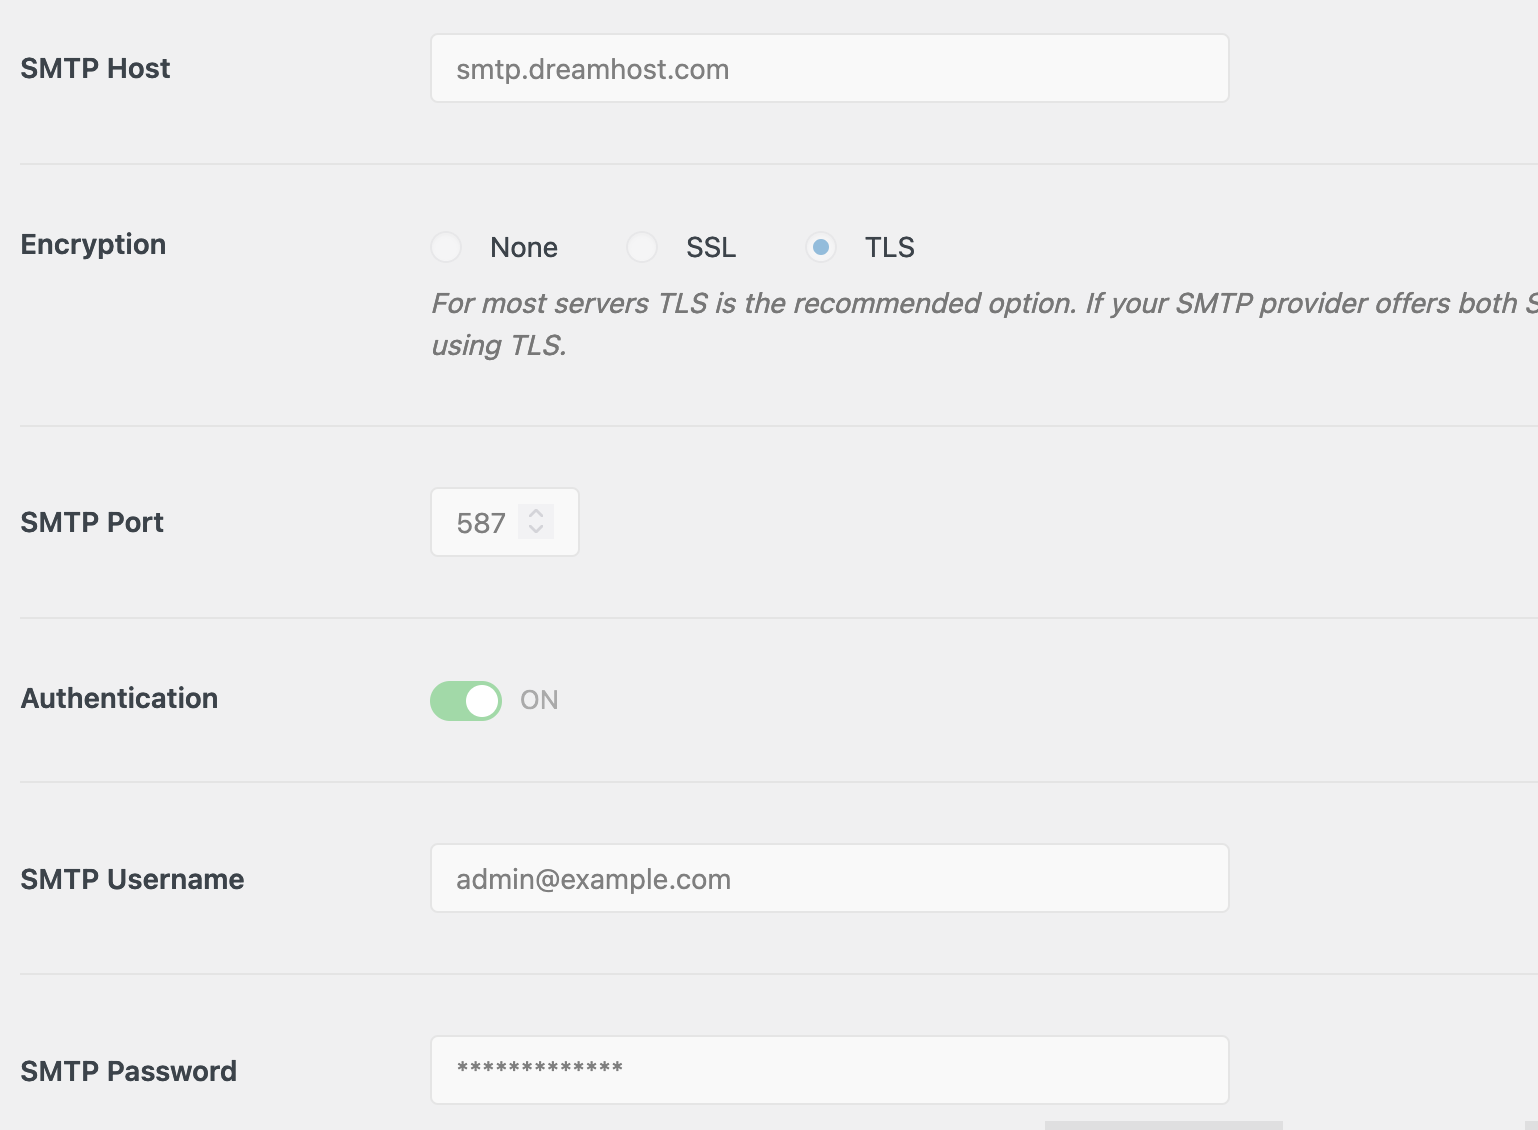
- Fill in the following under the Other SMTP section:
- SMTP Host - smtp.dreamhost.com
- Encryption - TLS
- SMTP Port - 587
- Toggle the Authentication button.
- Username - enter your DreamHost email address
- Password - enter your email address password
- Click the Save Settings button.
How do I add extra security?
This section is optional but highly recommended as it prevents your email credentials from displaying in the dashboard. If your admin dashboard is shared with others, this step prevents them from accessing any fields. See this page for further details.
If you proceed with this option, you do not need to enter any credentials into your WordPress dashboard, as they update automatically after adding them to your wp-config.php file.
How do I add the constants to my wp-config.php file?
- Log into your server via FTP or SSH.
- Use one of these articles to edit your wp-config.php file.
-
Scroll down in this file to the following line:
/* That's all, stop editing! Happy blogging. */
-
Add the these lines just above this line.
// turn constants on
define( 'WPMS_ON', true );

// general configuration settings
define( 'WPMS_MAIL_FROM', 'email@example.com' );
define( 'WPMS_MAIL_FROM_FORCE', true ); // True turns it on, false turns it off.
define( 'WPMS_MAIL_FROM_NAME', 'Example Name' );
define( 'WPMS_MAIL_FROM_NAME_FORCE', true ); // True turns it on, false turns it off.
define( 'WPMS_SET_RETURN_PATH', true ); // Sets $phpmailer->Sender if true.

// specific configuration settings
define( 'WPMS_SMTP_HOST', 'smtp.dreamhost.com' );
define( 'WPMS_SMTP_PORT', 587 );
define( 'WPMS_SSL', 'tls' );
define( 'WPMS_SMTP_AUTH', true );
define( 'WPMS_SMTP_USER', 'email@example.com' );
define( 'WPMS_SMTP_PASS', '********' );
define( 'WPMS_SMTP_AUTOTLS', true );
define( 'WPMS_MAILER', 'smtp' );
The only parts you need to change are WPMS_MAIL_FROM, WPMS_MAIL_FROM_NAME, WPMS_SMTP_USER and WPMS_SMTP_PASS.
-
Save the file.
View the plugin page and you'll see your credentials are not accessible.
Testing the plugin
Navigate to the WP MAIL SMTP > Email Test page and click the Send Email button to test.
You should see it was sent successfully.
After testing, you may see a DMARC warning. Your email will still function without it, but it's recommended you configure DMARC to further authenticate it.