Google site verification

Overview

Google requires domain ownership verification for some of the services they offer. If you have registered your domain, manage your DNS, or host your site with DreamHost, there are several options Google provides to verify your domain name as described in Google’s documentation on domain verification.

You can use any method mentioned below. It's also recommended to add more than one to ensure your site remains verified in case a method is accidentally removed.

Google site verification is different from your Google Analytics tracking ID#. View the following article for information on how to add your Analytics tracking code to your site:

Method 1 — Uploading an HTML file

This method downloads an HTML file from your Google console and uploads it to your DreamHost website. To use this method, your site must be hosted at DreamHost.

  1. Log into your Google Search Console.
    You are presented with two options.
    Google console add domain
  2. Enter your domain as a new property in the URL prefix field. Make sure to include https:// before the domain name.
    Google console verify domain
  3. Click the HTML file option from the list.
  4. Click to download the HTML file to your computer.
  5. Upload the file to your site via FTP.
  6. Back in your Google console, click the VERIFY button.

Method 2 — Add a meta tag to your homepage

This method adds a line of code to your site's homepage file. To use this method, your site must be hosted at DreamHost and you must be able to edit the HTML code of your site.

  1. Log into your Google Search Console.
    Google console add domain
  2. You are presented with two options. Enter your domain as a new property in the URL prefix field. Make sure to include https:// before the domain name.
    Google console verify domain
  3. Click the HTML tag option from the list.
  4. Click the COPY button to copy the meta tag code.
  5. Log into your site via FTP or SSH.
  6. Edit your homepage HTML file (usually the index.html file) via FTP or SSH.
  7. In the <head> section of the HTML file, paste in the meta tag line.
  8. Save the file.
  9. Back in your Google console, click the VERIFY button.

Add Google Analytics code

This method adds Google Analytics code to your site. To use this option, you must be an administrator on the Google Analytics account. You can use either your analytics.js or gtag.js snippet.

  1. Log into your Google Search Console.
    You are presented with two options.
    Google console add domain
  2. Enter your domain as a new property in the URL prefix field. Make sure to include https:// before the domain name.
    Google console verify domain
  3. Click the Google Analytics option.
  4. Click the analytics.js or gtag.js links for instructions on how to locate this code snippet.
  5. Log into your site via FTP or SSH.
  6. Edit your homepage HTML file (usually the index.html file) via FTP or SSH.
  7. In the <head> section of the HTML file, paste in the analytics code snippet.
  8. Save the file.
  9. Back in your Google console, click the VERIFY button.

Method 4 — Add a TXT record

This method adds a DNS record to your DreamHost panel. You must first log into your Google search console to retrieve the record to verify your site.

This method requires that your domain is using DreamHost’s nameservers, but you do not need to have an active hosting plan to verify your domain using this method.

Retrieve your TXT record in your Google console 

  1. Log into your Google Search Console.
    You are presented with two options.
    Google console add domain
  2. Enter your domain as a new property in the Domain field. You do not need to add https:// before the domain name.
  3. Click the CONTINUE button.
    Google console txt record
  4. A popup displays with code to create a TXT record.
  5. Click the COPY button to copy the Google TXT record.

Adding the TXT record to your DreamHost panel

  1. Navigate to the Manage Websites page.
  2. Click the Manage button to open the Domain Settings page, which allows you to adjust various settings for your site.
    • If in Grid view, click the Manage button at the bottom of the website box.
    • If in List view, click the Manage button at the far right of your domain name.
  3. Click the DNS tab.
  4. Click the Add Record button.
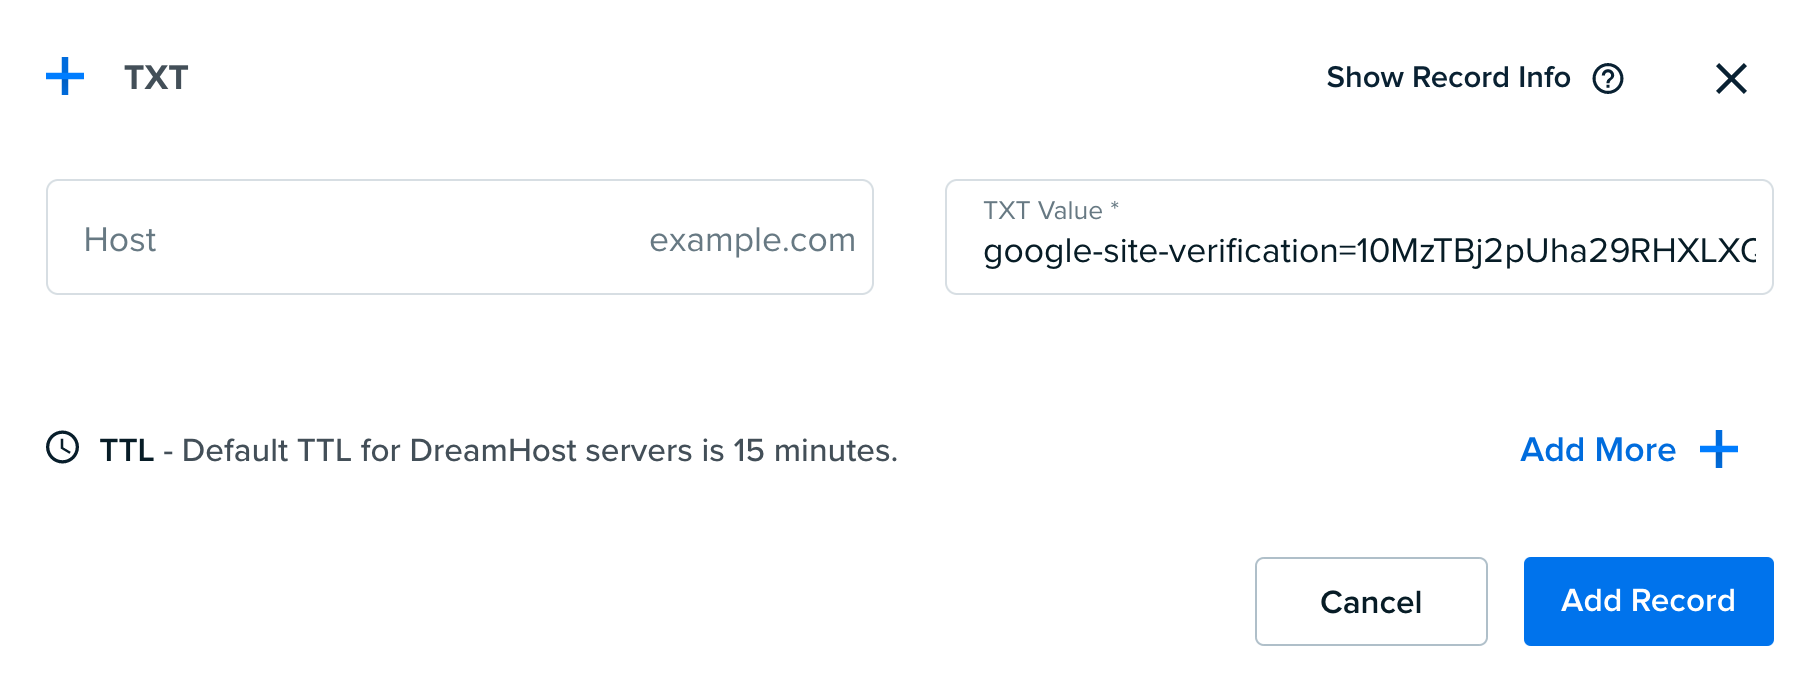
  5. Click the Add button in the TXT record section.
  6. Leave the Host field blank.
    Google txt record
  7. Enter the Google code into the TXT Value field.
  8. Click the Add Record button to save. 
  9. Click the Add Record Now! button to save this record.
  10. Back in your Google console, click the Verify button.

At first, you may see the verification failed because the record has not updated online yet. This record could take up to 4hrs to propagate online, but it's usually available sooner.

Check back in a few hours and Google will verify the TXT record.

CNAME record

This method adds a DNS record to your DreamHost panel. You must first log into your Google search console to retrieve the record to verify your site.

This method requires that your domain is using DreamHost’s nameservers, but you do not need to have an active hosting plan to verify your domain using this method.

Google provides you with one record consisting of two parts.

  • CNAME Label / Host: 1234abcd.example.com
  • CNAME Destination / Target: ab-cdefghijk.dv.googlehosted.com

This example adds the CNAME value of blog.example.com.

Add your domain as a property in your Google console

This step is only necessary if you have not already added your domain as a property.

  1. Log into your Google Search Console.
    You are presented with two options.
    Google console add domain
  2. Enter your domain as a new property in the Domain field. You do not need to add https:// before the domain name.
  3. Click the CONTINUE button. A popup displays with code to create a TXT record.
  4. Click the Verify later button.

Generate a CNAME record in Webmaster Central

  1. Open Webmaster Central.
    Google verification add CNAME
  2. Click the ADD A PROPERTY button.
    Google verification add CNAME
  3. Enter your domain URL.
  4. Click Continue.
  5. In the dropdown menu titled Select your domain registrar or provider, select Other at the bottom. A TXT record displays again.
    Google verification add CNAME
  6. Under Having trouble? Try an alternate option, select Add a CNAME record.
    Google verification add CNAME
  7. One CNAME record consisting of two parts displays. You must now add this record to your DreamHost panel.

Adding the CNAME record to your DreamHost panel

  1. Navigate to the Manage Websites page.
  2. Click the Manage button to open the Domain Settings page, which allows you to adjust various settings for your site.
    • If in Grid view, click the Manage button at the bottom of the website box.
    • If in List view, click the Manage button at the far right of your domain name.
  3. Click the DNS tab.
  4. Click the Add Record button.
  5. Click the Add button in the CNAME record section.
    Google verification add CNAME
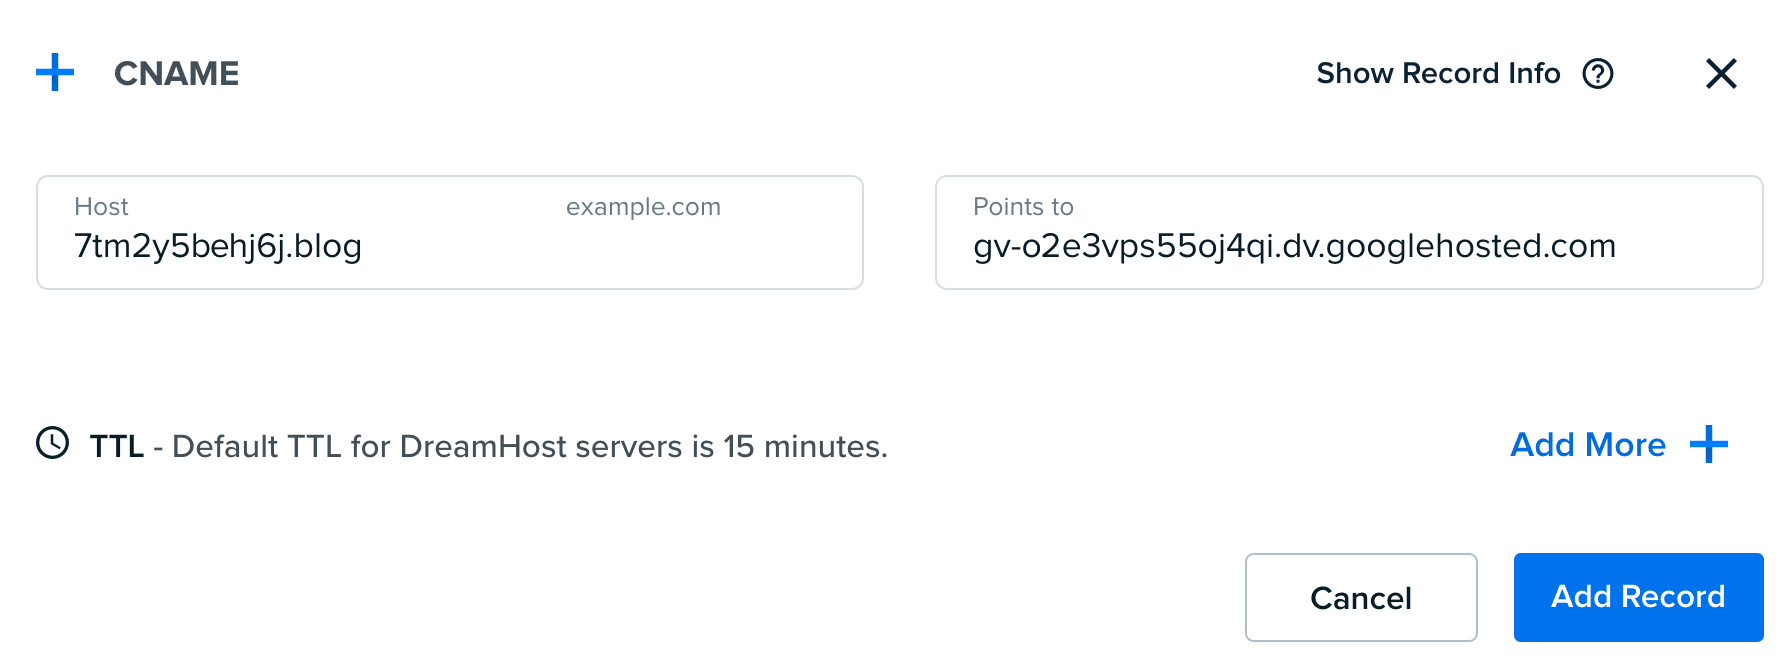
  6. In the Host field, enter the CNAME Label text.

    Do not add the period at the end as shown in the Google console.

    Do not add the primary domain printed in the CNAME Label field. For example, if you are adding this for a subdomain such as blog.example.com, only copy in the CNAME Label and subdomain portion while excluding the primary domain of example.com.

    For example, in the image above, the full record is:

    ##########.blog.example.com

    You would then only enter ##########.blog into the Host field.

  7. In the Points to field, enter the CNAME Destination text.
  8. Click the Add Record button to save. 
  9. Click the Add Record Now! button to save this record.
  10. Back in your Google console, click the Verify button.

At first, you may see the verification failed because the record has not updated online yet. This record could take up to 4hrs to propagate online, but it's usually available sooner.

Check back in a few hours and Google will verify the TXT record.

See also

Did this article answer your questions?

Article last updated PST.

Still not finding what you're looking for?