Overview
You can adjust the default DreamHost SPF record that DreamHost adds to your domain automatically — for example, when you also send email through a third party. This article describes the default record and how to change it.
Background
DreamHost automatically adds SPF records to your site, so you only need to manually adjust an SPF record if you are also sending email through a third party, such as Google or Mailchimp.
If you are sending email from such services AND also from DreamHost, you'll need to adjust the SPF record so it contains both mail servers.
What limitations should I be aware of?
Please be aware of the following before proceeding.
Google Workspace
If you're using Google Workspace, you cannot update the SPF record. The field remains uneditable.
Subdomains
SPF treats subdomains separately, so you may need to specify SPF records for both the primary domain (example.com) and any subdomain (such as blog.example.com).
Wildcard
Wildcards for TXT records are not supported by DreamHost. This is also generally discouraged, as stated in RFC 4408 §3.1.5.
Nameservers
These steps assume your nameservers are pointing to DreamHost. If they are not, you must update the SPF record at the company where they are currently pointing instead.
How do I adjust an SPF record?
You can only use a single SPF record, so you must combine the additional servers into the existing SPF record.
- Navigate to the Manage Websites page.
-
Open the DNS Settings page:
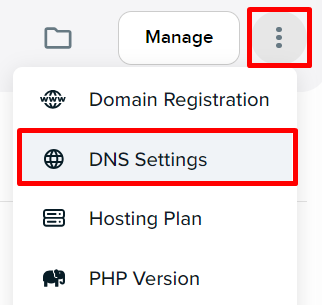
- If in Grid view, click the 'vertical 3 dots' button under your domain. From the popout menu, click the DNS Settings link.
- If in List view, click the 'vertical 3 dots' button to the right of your domain. From the popout menu, click the DNS Settings link.
The domain's DNS records display.
- Click the Add Record button.
- Hover over the TXT Record section and click the ADD link.
- Enter the following:
- Host: This field can be anything. Very often, it’s left blank. You do not need to add the domain name in this field.
-
TXT Value *: Enter the SPF record value of this record to point to.
The following example assumes you're sending email from DreamHost and Google. The custom Google record is added towards the end.
v=spf1 mx include:netblocks.dreamhost.com include:relay.mailchannels.net include:_spf.google.com -all
- Click the Add Record button to save.
Allow up to 6 hours for the DNS record to propagate after you save the record.
How do I edit an SPF record?
These steps can only be performed if you previously adjusted the SPF record using the instructions above. If so, a pencil icon appears next to the record.
- Navigate to the Manage Websites page.
-
Open the DNS Settings page:
- If in Grid view, click the 'vertical 3 dots' button under your domain. From the popout menu, click the DNS Settings link.
- If in List view, click the 'vertical 3 dots' button to the right of your domain. From the popout menu, click the DNS Settings link.
The domain's DNS records display.

-
Scroll down to a TXT record and click the pencil icon on the right.
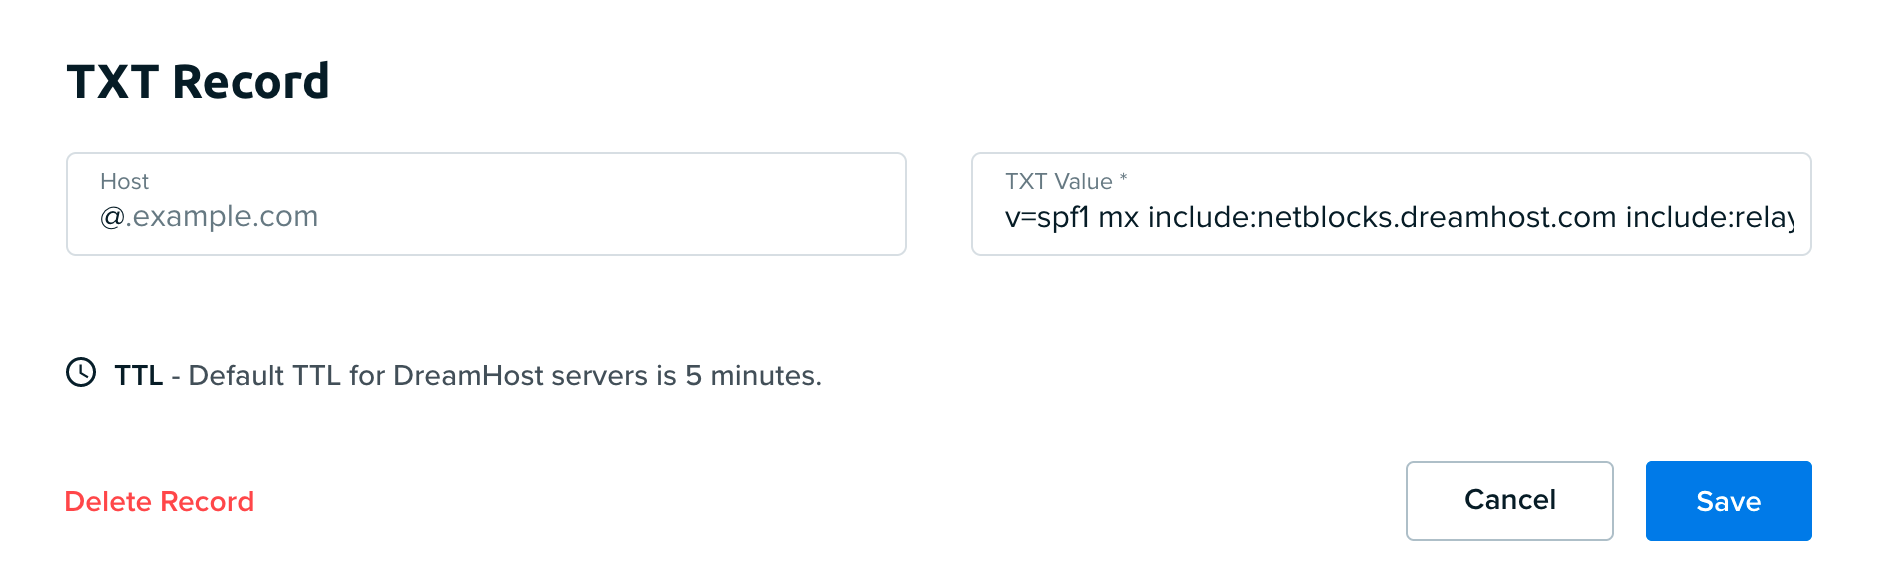
- Edit the TXT Value box to adjust the SPF value.
- Click the Save button when finished.
Allow up to 6 hours for the DNS record to propagate after you save the record.
What are the advanced SPF options?
An advanced SPF record includes more than just the default mail servers: it also has information on all other servers that send mail for the domain. For example:
v=spf1 ip4:321.321.321.321 include:_spf.google.com include:shaw.ca mx ~all
What are the SPF customization options?
| Tag | Description |
|---|---|
v=spf1 |
Identifies this DNS record as an SPF version 1 record. |
ip4:321.321.321.321 |
IP address of a specific server, such as your web server for scripts that send mail directly from that server. You can get your web server IP from the Manage Websites page. View the DNS article for further details. |
include:_spf.google.com |
Includes all of the SPF records from Google, which in this example is where the domain's mail service is hosted. |
include:shaw.ca |
Includes all the SPF records for Shaw Cable in Canada, an ISP. In this example, mail from the domain is sometimes sent through the ISP's SMTP server. |
mx |
Includes all of the MX servers the domain uses, listed in the domain's MX DNS records. |
-all |
Says all other servers are not authorized, and only mail sent from the listed servers will 'pass'. |
The symbol before "all" indicates how strict the SPF record is enforced.
| Symbol | Description | Example |
|---|---|---|
| ? | A question mark makes the whole record inactive, as though the domain had no SPF record at all. | ?all |
| - | A dash makes the record strict. Any mail from servers not listed will be marked "fail" and may be marked as spam or rejected entirely. | -all |
| ~ | A tilde is between the other two options in strictness. Any mail from servers not listed will be marked "softfail". While intended for testing, it is recommended to be used to avoid delivery issues, as noted in this article. | ~all |
Which SPF records do common mail providers use?
The following table shows SPF information for popular mail providers.
| Provider | SPF Information |
|---|---|
include:cmail1.com |
|
include:spf.constantcontact.com |
|
Freshbooks |
include:_spf.freshbooks.com |
include:_spf.google.com |
|
Hostgator |
include:websitewelcome.com |
include:servers.mcsv.net |
|
Microsoft/Hotmail |
N/A (uses SenderID) |
Shaw Communications Ltd. |
include:shaw.ca |
Telus |
include:telus.net |