Overview
This article explains how to edit or delete a custom DNS record you have previously added in the panel.
If you're instead attempting to remove non-custom DreamHost DNS-hosting records, review the Setting your domain to 'DNS Only' article instead.
Editing a custom DNS record
To edit an existing custom record:
- Navigate to the Manage Websites page.
-
Open the DNS Settings page:
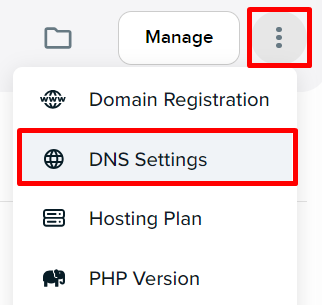
- If in Grid view, click the 'vertical 3 dots' button under your domain. From the popout menu, click the DNS Settings link.
- If in List view, click the 'vertical 3 dots' button to the right of your domain. From the popout menu, click the DNS Settings link.
The domain's DNS records display.
- Click the pencil
 icon to the right of the record, under the Custom Records section. This opens the record for you to edit.
 - Click Save.
Deleting a custom DNS record
To delete a custom record:
- Navigate to the Manage Websites page.
-
Open the DNS Settings page:
- If in Grid view, click the 'vertical 3 dots' button under your domain. From the popout menu, click the DNS Settings link.
- If in List view, click the 'vertical 3 dots' button to the right of your domain. From the popout menu, click the DNS Settings link.
The domain's DNS records display.
- Click the pencil icon to the right of the record, under the Custom Records section. This opens the record for you to edit.
-
Click the Delete Record button beneath the record fields.
A message appears asking you to confirm the deletion of this record.
- Click the Remove button. A confirmation message appears that confirms its deletion.