Overview
This article explains how to configure the Google Authenticator app when enabling Multi-Factor Authentication in your DreamHost panel.
Background
This app was chosen because it's free and widely available on many platforms. For example:
See this page for full details of Google’s security method and implementations.
In the event of a lost or disconnected mobile device, Google Authenticator also provides a list of non-expiring backup codes (during the initial configuration) that can be used. Outside of the Google Authenticator app, SMS text messages or voice calls can be used to obtain the 2nd layer code.
Installing the Google Authenticator App
Before you can enable Multifactor Authentication on your DreamHost account, you'll need to install the Google Authenticator app on your smartphone or tablet device.
If you already have the Google Authenticator app on your smartphone or tablet device, you just need to add a new app:
- iOS — click the "+" in the lower right corner
- Android — open the settings for the app and click "Add account"
The app can be downloaded from your device's App Store:
Enabling MFA in the panel
The following steps connect the app to your DreamHost account.
- Log in to the panel and navigate to the Security page.
- Under the section titled Multifactor Authentication:
- Current Password: Enter your DreamHost account password.
-
Multifactor Authentication Type: Click the dropdown menu to choose which of the two Google methods you’d like to use:
- - Google Authenticator, Time-Based (recommended)
- - Google Authenticator, Counter-Based
DreamHost recommends time-based one-time passcodes, as they provide better protection since each code is only valid for a short amount of time. They also automatically stay in sync with DreamHost’s servers, as opposed to counter-based codes, which require manual syncing.
If you use counter-based codes, you will need to press the refresh button next to the code in the Google Authenticator App each time you use it to advance it to the next code.
- Click the Get Started button.
- A QR Code and a 16-digit secret key displays:
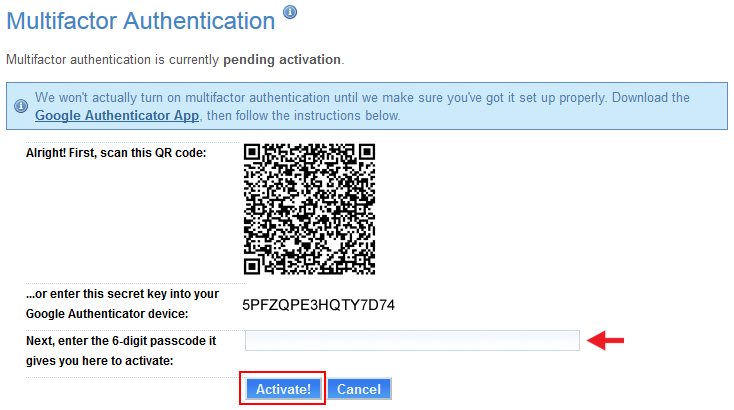
- Use the Google Authenticator app to scan the QR code.
- If your device does not have a camera, you can manually enter the 16-digit secret key (shown below the QR code) into the app manually.
- If you have more than one device running Google Authenticator, scan the QR code or enter the key on every device that you want to use with your DreamHost account.
- When the Google Authenticator app displays a 6-digit passcode, enter it in the passcode field.
- If you are using counter-based codes, you may need to press the refresh button to display the first code.
-
Click the Activate! button to sync DreamHost's server to your device.
DreamHost highly recommends saving the backup codes presented in the ‘Success!’ dialog box. Make sure you write them down before exiting the page.
If you suspect your account may be compromised (for example if you have lost your phone or mobile device), and you're using Google Authenticator, you can use the Regenerate Key button to invalidate the old key and create a new one.
If you are backing up an iPhone to your local computer, select 'Encrypt iPhone Backup' to also back up the Google Authenticator's account(s). Otherwise, Google Authenticator won't have any accounts associated with it when it's restored.
Disabling MFA
DreamHost highly recommends keeping Multifactor Authenticator active since it helps secure your account.
Navigate to the Security page and click the Disable button on the MFA section.
- A success message appears.
What if I need a new phone?
If you are buying a new phone, make sure to first disable Multifactor Authentication in your panel. When you have your new phone, log back into your panel and set it up again, as shown above.