Overview
This article provides solutions to several common issues that may occur in your PuTTY environment.
How to fix common issues
The following sections show you how to fix translation and connection issues in PuTTY.
Non-English directories/filenames do not appear correctly
Directory and filenames that contain non-English/Asian characters may sometimes appear as ?????? or even as a corrupt file in PuTTY.
If you experience this issue with your filenames or content not showing up correctly, you should add the following to your .bash_profile file to enable UTF support. See the following articles for instructions on how to update the file (depending on if you're using an FTP client or SSH):
export LC_ALL=en_US.UTF-8
export LANG=en_US.UTF-8
export LANGUAGE=en_US.UTF-8
export G_FILENAME_ENCODING=UTF-8
UTF-8 is most likely enabled already. You can check in your terminal by entering the locale command:
[server]$ locale
LANG=en_US.UTF-8
LANGUAGE=
LC_CTYPE="en_US.UTF-8"
LC_NUMERIC="en_US.UTF-8"
LC_TIME="en_US.UTF-8"
LC_COLLATE=C
LC_MONETARY="en_US.UTF-8"
LC_MESSAGES="en_US.UTF-8"
LC_PAPER="en_US.UTF-8"
LC_NAME="en_US.UTF-8"
LC_ADDRESS="en_US.UTF-8"
LC_TELEPHONE="en_US.UTF-8"
LC_MEASUREMENT="en_US.UTF-8"
LC_IDENTIFICATION="en_US.UTF-8"
LC_ALL=
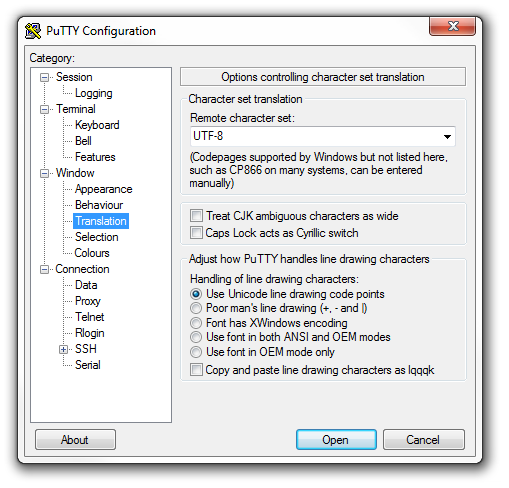
You can see the first line is LANG=en_US.UTF-8. If the listings are still not appearing correctly, it’s most likely because of the terminal client you’re using. In PuTTY, you can manually adjust the translation option to UTF-8:
- Open the PuTTY general configuration.
- In the left Category list section, select Window > Translation.
- In the dropdown for Remote character set, choose UTF-8.
- Go back to the Session category and make sure to save your current session with all settings.
When you log in again using PuTTY, the non-English characters display correctly.
Idle connections are dropping
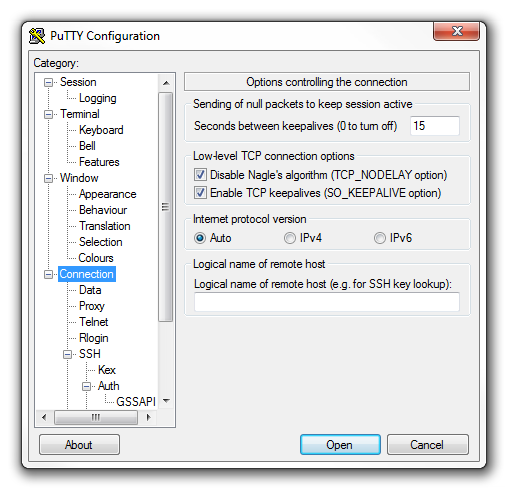
DreamHost and other ISPs may kill SSH connections that remain idle longer than a certain number of minutes. In PuTTY (for Windows), you are able to adjust that setting in the PuTTY Configuration box as follows:
- Open the PuTTY general configuration.
- In the left Category list section, select Connection.
- In the Seconds between keepalives (0 to turn off) field, enter 15.
- Check the Enable TCP keepalives (SO_KEEPALIVE option) box.
The SSH client asks the server for a sign of life every 15 seconds, thus keeping the connection open.
Connection issues
You may see the following error when connecting:
No supported authentication methods available (server sent public key)
This could be an issue with how the public key was saved. PuttyGen will create a public key file that looks like this:
---- BEGIN SSH2 PUBLIC KEY ----
Comment: "ed25519-key-20250305"
AAAAC3NzaC1lZDI1NTE5AAAAICSt22nRRmm8g+d0E6Cpor9kTJbgw1dFsufSyj1K
I1rf
---- END SSH2 PUBLIC KEY ----
The key needs to be saved on a single line. Open the key in PuttyGen, copy it from there, and then paste it into a program such as Notepad. This results in the key being saved on 1 line:
ssh-ed25519 AAAAC3NzaC1lZDI1NTE5AAAAICSt22nRRmm8g+d0E6Cpor9kTJbgw1dFsufSyj1KI1rf ed25519-key-20250305
Paste this from Notepad into the authorized_keys file on your server, and it should work. See this page for a more detailed explanation.

