Overview
This article explains how to update the nameservers for a domain registered with DreamHost.
This is necessary if you would like to host your domain and all of its DNS records at another company. It can also be used to run your domain's DNS through a CDN (content delivery network) like Cloudflare.
Please note that when you change your nameservers, ALL of your DNS records then point to the new hosting company.
If you need to continue hosting specific services at DreamHost (such as email) while hosting your domain at another company, you would need to update the individual A records instead. See this article for detailed information on how these records control your domain's services.
Updating your nameservers
There are two options to update the nameservers in the DreamHost panel.
Option 1 — The Manage Websites page
- Navigate to the Manage Websites page.
-
Open the DNS Settings page:
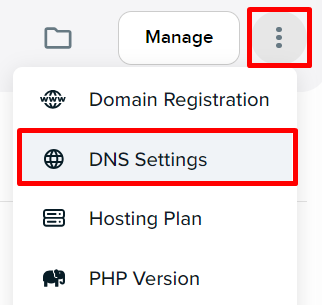
- If in Grid view, click the 'vertical 3 dots' button under your domain. From the popout menu, click the DNS Settings link.
- If in List view, click the 'vertical 3 dots' button to the right of your domain. From the popout menu, click the DNS Settings link.
The domain's DNS records display.

- Scroll down to the Nameservers section.
-
Click the Change button.

- Select the I'll use my own nameservers option.
- Enter your new nameservers.
- Click the Save button when finished.
After saving, the new nameservers will take several hours to propagate online. You can track the update status at whatsmydns.net.
Option 2 — The Manage Domains page
- Navigate to the Manage Domains page.
-
Under the Domains column, check the box next to your domain.
For *.uk domain names, a message appears that tells you to contact Nominet to change the domain registration contact information in the panel.
Clicking the link takes you to secure.nominet.org.uk. You can then change your information there.
- Click the Nameservers button. The Nameservers page opens.
- Click the Use another host's nameservers button.
- Enter your new nameservers in the fields provided.
- Click the Confirm button to save
After saving, the new nameservers will take several hours to propagate online. You can track the update status at whatsmydns.net.