Overview
You can create a free Cloudflare account and point your DreamHost-registered domain's nameservers to Cloudflare — confirm the domain isn't using DNSSEC first, then sign up, get Cloudflare's two nameservers, and set them on your domain's DNS page in the panel. This article walks through creating the account, adding an SSL certificate, and enabling DNSSEC.
Background
This article assumes you have purchased your domain registration at DreamHost and are updating your domain's nameservers to point to Cloudflare.
If you instead purchased your domain registration outside of DreamHost, you will need to update your domain’s nameservers with the company where your domain is registered.
DNSSEC
Before proceeding, make sure your DreamHost domain is not using DNSSEC. You can check your domain at this site.
Enter your domain name to check if it's using DNSSEC. If you see any red X icons, your domain is not using DNSSEC, and you can proceed with the following steps. Otherwise, contact support for assistance.
How do I create a free Cloudflare account?
The following steps walk you through creating a free Cloudflare account, adding an SSL certificate, and enabling DNSSEC.

Create a free Cloudflare account
- Sign up for a Cloudflare account.
- After completing the signup and verifying your email address, follow Cloudflare's onboarding process:
- When prompted, enter the domain name you want to add to Cloudflare. Additional details for this step can be found in Cloudflare’s documentation.
- After Cloudflare reviews your existing DNS records, confirm or modify them if necessary.
- Select a Cloudflare plan when prompted. The free plan is available for basic use.
- Continue through the setup until Cloudflare provides two unique nameservers for your domain.

Add the unique Cloudflare nameservers to your domain at DreamHost
If your domain is not registered at DreamHost, you will instead need to change your nameservers at the registrar where you purchased the domain. See this article for more information.
- Log in to your account at DreamHost.
- Navigate to the Manage Websites page.
-
Open the DNS Settings page:
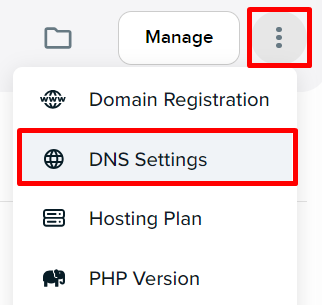
- If in Grid view, click the 'vertical 3 dots' button under your domain. From the popout menu, click the DNS Settings link.
- If in List view, click the 'vertical 3 dots' button to the right of your domain. From the popout menu, click the DNS Settings link.
The domain's DNS records display.
- Scroll down to the Nameservers section and click the Change button.
- Click the I'll use my own nameservers radio button.
- Add the two Cloudflare nameservers.
-
Click the Save button.
After you save the records, they will be visible on your domain's DNS page.
- Return to the Cloudflare dashboard and confirm the nameserver update. Nameserver changes can take up to 24 hours to fully propagate, and Cloudflare will notify you once the site becomes active.

Add an SSL certificate
See this article to learn more about how to add and configure an SSL certificate at Cloudflare.
DreamHost also provides a free Let’s Encrypt SSL certificate for eligible domains. When using Cloudflare with a valid SSL certificate from DreamHost, it’s recommended to set Cloudflare’s SSL/TLS mode to Full (Strict).
Configuring an exemption rule in Cloudflare can also help prevent issues during certificate renewals. See this article to learn more.

Enable DNSSEC (optional)
At this point, your nameservers are now pointing to Cloudflare, and you can enable DNSSEC on your domain. This is optional but can help secure your domain. See this article for further details.

Review Cloudflare configuration settings (optional)
Cloudflare provides recommended configuration options that can be reviewed and adjusted at any time after the initial setup. See this Cloudflare article to learn more.
See also
DreamHost links
Third-party links
- Create a Cloudflare account — Cloudflare docs support page
- Free Plan Overview — Cloudflare website