Overview
This article explains two ways to update all URLs in your database to a new URL.
Reasons to update the URL
There are a few reasons you would need to update the URLs in your WordPress database.
Moving to a new domain
-
The primary reason you would follow these instructions is after manually moving your WordPress site from an old domain to a new domain. For example:
-
https://example.com
to - https://dreamhost.com
You would then use these steps to update the URLs in the imported database.
-
https://example.com
Adding or removing www
-
Another reason to update your URLs is if you have created a custom .htaccess file to add or remove www from your domain. This may result in a "Too many redirects" or "The page isn't redirecting properly" error. You can then use these steps to ensure all URLs add or remove www.
Forcing HTTPS to the URL
-
If you've added an SSL certificate, the first part of the URL now changes from HTTP to HTTPS, but you should also ensure that all URLs in your database also use the HTTPS version.
How to update the database URLs
Either of the following options can be used to update the URLs in your database.
Option 1 — Using the command line
If you are familiar with the command line, you can use wp-cli to update all URLs in the database at once.
This example changes the URL from example.com to dreamhostexample.com.
- Log into your server via SSH.
- Navigate to your WordPress directory. Make sure to change username to your Shell user:
[server]$ cd /home/username/example.com
- Create a database backup in your user directory. This is recommended so you can revert your changes if needed:
[server]$ wp db export ~/backup`date +"%d-%m-%Y"-%T`.sql
- Test the update first.
- The --dry-run flag is used to test the command without making any changes.
- The --all-tables-with-prefix flag is used to ensure the change is applied to all of the tables.
[server]$ wp search-replace 'https://www.example.com/' 'https://dreamhostexample.com/' --all-tables-with-prefix --dry-run
The above response confirms that there are replacements to be made. When you’re ready to run the command, remove the --dry-run flag:
[server]$ wp search-replace 'https://www.example.com/' 'https://dreamhostexample.com/' --all-tables-with-prefix
- Clear any cache that results from the search-replace functions:
[server]$ wp cache flush
Success: The cache was flushed.
Option 2 — Using a plugin
To complete these steps, you must be able to log into your WordPress dashboard. If you cannot log in after moving your WordPress site to the new domain, make sure you have updated the 'home' and 'siteurl' in the database to the new URL first.
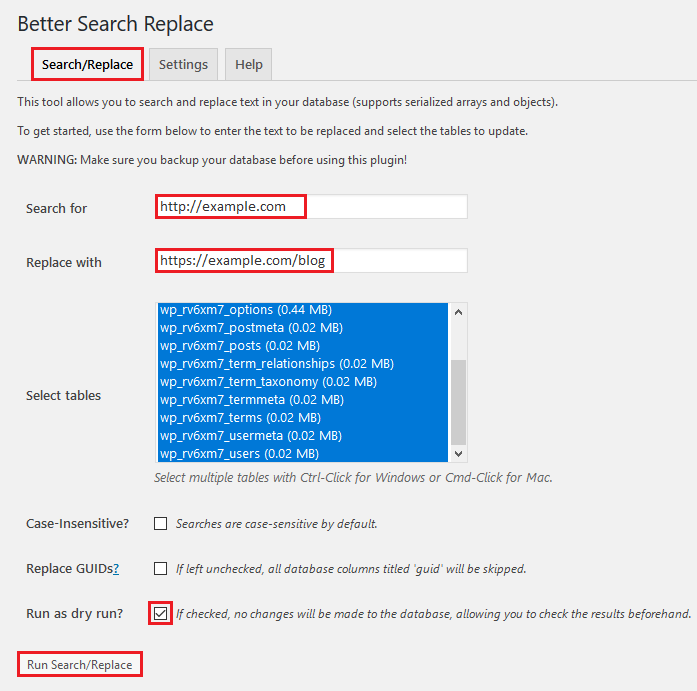
This option uses the Better Search Replace plugin to update all URLs in the database. An instructional video is also available.
The examples in this step add HTTPS to the URL and change the domain name from http://example.com to https://example.com/blog.
- Make a backup of your database. This is recommended so you can revert your changes if needed.
- Log in to your WordPress dashboard.
- Install and activate the Better Search Replace plugin.
- Navigate to the plugin under Tools > Better Search Replace.
- Click the Search/Replace tab.
- Enter your current HTTP URL in the first field titled Search for. For example:
- http://example.com
- Enter your new URL in the second field titled Replace with. For example:
- https://example.com/blog
- Select all tables.
- Leave Replace GUIDs unchecked (recommended). See this page for further details.
- Check the box titled Run as dry run?.
- Click Run Search/Replace. This responds with a message notifying you of what would have been updated if you did not check the Dry Run box.
- Run it again with the Run as dry run? box unchecked. A confirmation displays notifying you of how many changes were made.
Clearing your cache
After all URLs have been updated, you should delete your cache. This helps ensure the new URLs are used when visiting your site.
