Overview
This article explains how to manually change the domain name of your WordPress site. For alternative options, see this article.
Manually moving to a new domain
These steps move a WordPress installation between two domains hosted at DreamHost.
-
oldsite.example.com
and - newsite.example.com

Back up your site
You should always back up your website data before making any changes. See this article for instructions on how to back up your website files, database, and any email you wish to keep.

Add hosting for the new site
Add the new domain (newsite.example.com) to a hosting plan in your panel.

Move your files to the new website
- Upload your web files via FTP.
- Upload your database using the Migrate MySQL article.
- Migrate email from your old domain:
- Email Setup: Use this article to set up your email addresses on the new domain.
- Import another host's email into DreamHost: This article explains how to import your email to the new domain.
- Email Client Configuration: This article is a guide to different email configurations you can use.

Edit the new wp-config.php file
Log into your new site (newsite.example.com) via FTP or SSH and open the wp-config.php file (this is in your site's directory). You’ll see this section with the database information:
define('DB_NAME', ‘exampledatabase’);
define('DB_USER', 'exampledbuser');
define('DB_PASSWORD', ‘database user password’);
define('DB_HOST', 'mysql.example.com');
define('DB_CHARSET', 'utf8');
define('DB_COLLATE', '');

$table_prefix = 'wp_2hdy121d_';
Update these lines to your new database credentials:
Table prefix
Replace the existing WordPress $table_prefix value with the imported $table_prefix value.
Open the database file you previously downloaded in a text editor to view the correct prefix of each table. The example below shows what you will see. In this example, the table prefix is wp_mwpp89_.
--
-- Table structure for table `wp_mwpp89_comments`
--

Update the 'home' and 'siteurl' in the database
This step updates the 'home' and 'siteurl' in the database, allowing you to log in to your new site's WordPress dashboard. Once logged in, you can then complete the next step to update all remaining URLs in the database to the new website.
- Log in to phpMyAdmin.
- Click your database in the left pane. Several tables appear below it.
- Click the your wp_options table.
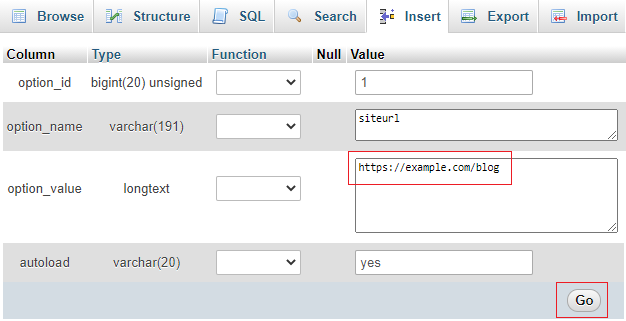
- Locate the 'home' and 'siteurl' rows. Click the pencil icon next to each to edit.
- Click the pencil icon next to each to edit.
- Type in the new URL.
- Click the Go button to save the settings. Do this for both the siteurl and home options.
You can now log in to your site at example.com/wp-login.php and proceed with updating the remaining URLs.

Update all URLs in the database
You must now update all URLs in the imported database to use the new domain. View the following article for several options on how to accomplish this:
Your website now loads on the new domain name and should appear exactly the same as it did on the old domain.
Redirecting from the old site
It's possible that former visitors to your old website have bookmarked the old URL in their browser. You can automatically redirect them to the new website by logging into the old domain name and creating an .htaccess file with a 301 redirect. See this article for examples of how to configure this.


