Overview
The following shows you how to view your DreamHost DNS records in the panel.
Viewing your DNS records in the panel
To view your DNS records, navigate to Manage Websites and open the DNS Settings page:
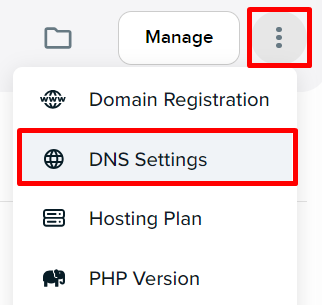
- If in Grid view, click the 'vertical 3 dots' button under your domain. From the popout menu, click the DNS Settings link.
- If in List view, click the 'vertical 3 dots' button to the right of your domain. From the popout menu, click the DNS Settings link.
The domain's DNS records display.
Viewing Nameservers
Scroll to the bottom of the list of DNS records to view your nameservers. These records control where all of your domain's DNS records are managed.
Here you can see if they are pointing to another hosting company or DreamHost. If you are using DreamHost hosting services (including parking or a redirect of the site), and your domain is registered with DreamHost, you should use these nameservers:
- ns1.dreamhost.com
- ns2.dreamhost.com
- ns3.dreamhost.com
As long as the nameservers are pointing to DreamHost, the records on your domain’s DNS page will be applied to your domain.
How to confirm where your domain's DNS is pointing
The steps above confirm what your DreamHost DNS records are set to at DreamHost. However, this may be different than your domain's current DNS settings since they could still be pointing to a different company. View the following articles for more information on how to confirm where your domain and DNS are hosted:
- Where is my website hosted?
- Checking where your DNS is hosted
- whatsmydns.net — A popular site that checks DNS records around the world