Overview
You can set up passwordless login in PuTTY by generating an Ed25519 SSH key pair with PuTTYgen, uploading the public key to your server's ~/.ssh/authorized_keys file, and configuring PuTTY to use the private key. Make sure you have first configured PuTTY before proceeding with this article.
These instructions can also be used to create and assign SSH keys to an admin/root user on a Dedicated Server.
How do I create a key pair?
The following generates the access key that will be used with PuTTY.
- Open the puttygen.exe file you downloaded when configuring PuTTY. You’ll use this to create your private/public keypair.
- In the PuTTY Key Generator box, select the radio button at the bottom for Ed25519.
- Click the Generate button.
- Move your mouse around the box to help generate the key.
Once the key is created, a new pop-up box appears: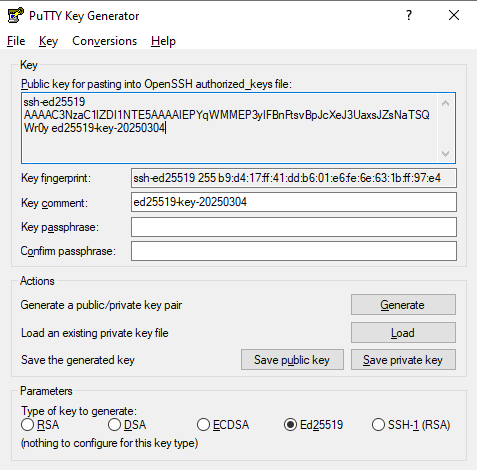
- Click both the Save public key and Save private key buttons that appear on the bottom right to save these keys to your computer.
MySQL WorkBench
If you're creating a key pair for MySQL Workbench, you must export the private key in OpenSSH format.
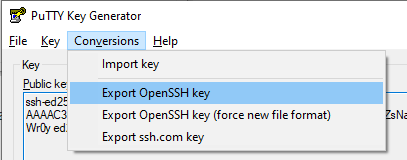
- Click the Conversions tab.
- Select Export OpenSSH key.
- Save this to your computer without an extension.
You can now use this key to import into MySQL Workbench.
Recommendations when saving the generated keys
- When you save the public key, name it something like dreamhostpublickey. Do not manually add the extension as that isn’t necessary.
- When you save the private key, name it something like dreamhostprivatekey and be sure to save it in a secure location on your computer. Again, do not manually add the extension as that isn’t necessary.
- When saving, you are prompted with a message about a passphrase. Click Yes to save without a passphrase.
How do I upload the public key to my server?
The following steps show you how to upload and implement the access key that you generated previously.

Uploading the public key via FTP
Upload the public key you just created to your DreamHost user's home directory. You can use an FTP client such as Filezilla to do this.

Changing permissions on the .ssh directory
- Log in to your DreamHost web server through PuTTY.
-
Navigate to your user's /home directory:
[server]$ cd
-
Create an /.ssh directory by running the following command:
[server]$ mkdir .ssh
-
Change the permissions on this directory to 700:
[server]$ chmod 700 .ssh

Appending the public key to the authorized_keys file
-
Append the public key you just uploaded to a new file named authorized_keys, which is located in the /.ssh directory:
[server]$ ssh-keygen -i -f dreamhostpublickey >> ~/.ssh/authorized_keys
Make sure the name of the public key file in the command is the name of the file you uploaded.
-
Adjust permissions by using this command:
[server]$ chmod 600 ~/.ssh/authorized_keys
-
Remove the original dreamhostkey.pub file:
[server]$ rm dreamhostpublickey
The key is saved on the server (protected from access by others).
How do I configure the automatic login?
The following steps complete the configuration in PuTTY for a passwordless login.
- Open PuTTY to access its configuration menu.
- Click Connection > Data category on the left.
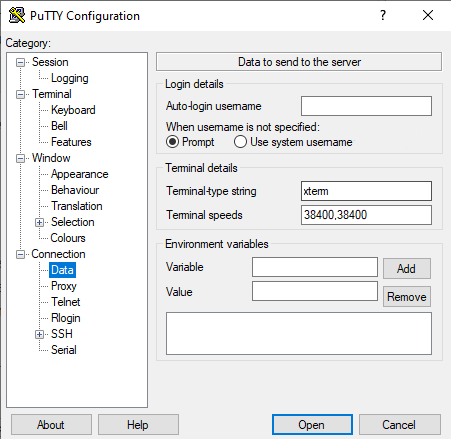
- Enter your DreamHost shell username in the field named Auto-login username.
- Click Connection > SSH > Auth.
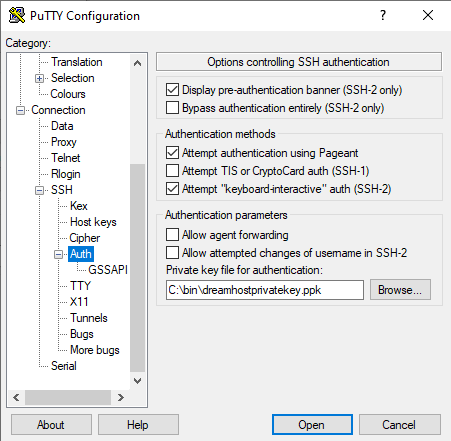
- Click the Browse button and navigate to the location on your computer where you saved your dreamhostprivatekey file.
- In the configuration menu, click the Session category and enter the following:
- Host Name: yourserver.dreamhost.com (this is your DreamHost servername)
- Port: 22
- Connection type: SSH
-
Saved Sessions: Enter a new name
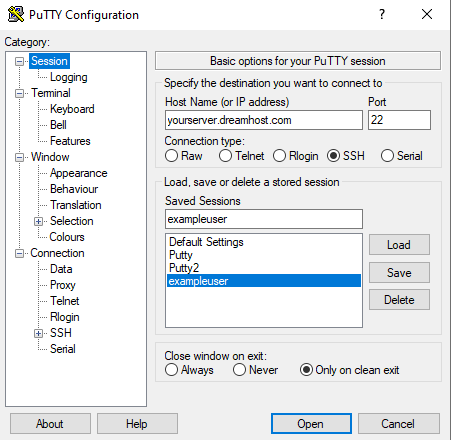
- Click the Save button.
-
Click the new saved session you created for the passwordless login, then click the Open button.
You are logged in without a password prompt.
The first time you log in, a security message warns you about the server's host key. You can verify the key using the instructions in this article.
After you have verified the key, click the Accept button.