Overview
This article describes how to migrate your WordPress site from your current host to DreamHost. These instructions can be used for any type WordPress and DreamPress website as well as migrating to a different domain name.
If you are having trouble migrating your website from another host or just don't have the time, DreamHost offers a service that takes care of that for you. See the Website migration services article for more information.
For additional Automated and Professional migration options, see the Migrating WordPress overview article.
Migrating WordPress
The following steps back up your WordPress from your old hosting company and upload it to your new DreamHost WordPress installation.
Prerequisites
Make sure your domain is fully hosted in your DreamHost panel and that WordPress is already installed.
DreamHost recommends using the DreamHost WordPress installer or purchasing a DreamPress plan to have the WordPress core files installed automatically.

Back up your website at your current host
Before making any changes to your website, DreamHost highly recommends backing up both your website files and your database at your current hosting company.
Website files — Contact your current host for instructions on how to back up your website files. They should have instructions on how to log in to your server via FTP to download your files and save them to a .zip file.
Database file — Contact your current host for instructions on how to export your website's database. You will need to download a file ending with a .sql extension.

Clear out your DreamHost database
When you installed WordPress in the panel, a database was created automatically for you. You must now clear out all tables in this database so it is blank. You can then import your SQL file into it.
- Log in to your database via phpMyAdmin. (See this article for DreamPress sites).
-
Select your database name in the left menu:
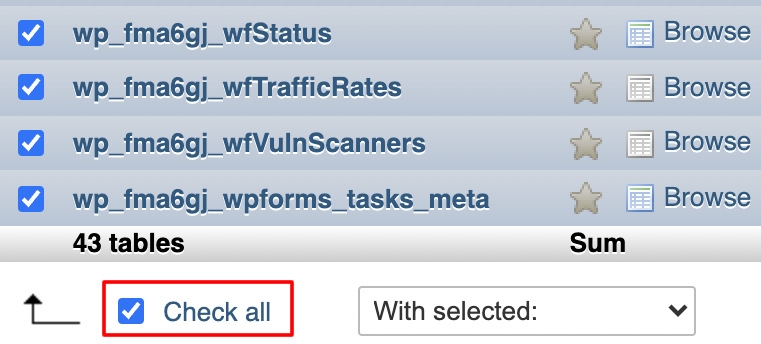
- Click Check all so all tables are checked.
- In the With selected: dropdown at the bottom, select the Drop option. The page reloads and a Yes button appears on the bottom right.
- Click Yes to remove all tables.

Import your database file
The following describes two different methods (phpMyAdmin and SSH) to import your database.
Using phpMyAdmin (simple, limited to 200MB)
See this article for instructions.
Using SSH via wp-cli commands (more advanced)
These steps use wp-cli to run an import command on your DreamHost server.
If you uploaded a custom wp-config.php file (to replace the one generated during installation), this command will fail. You must first update this file to use the new DreamHost database credentials.
- Log in to your server via FTP.
- Upload your database file into your user's home directory.
- Log in to your server via SSH.
- Run the following command in your user's home directory to import the file into your database. Make the following changes:
- Replace filename.sql with your backed-up database file.
- Replace path/to/wordpress with your website directory.
[server]$ wp db import filename.sql --path='path/to/wordpress'
Success: Imported from 'example-backup.sql'.
Large files may take longer but you will receive a confirmation when the import completes.

Upload the wp-content folder
This step extracts the contents of your backed-up .zip file and uploads the wp-content folder to your DreamHost server.
Uploading your .htaccess and wp-config.php files is only necessary if you have custom coding within these files.
Extracting on your computer
Right-click the file and select the Extract option. All of your former WordPress files and directories are extracted into a new folder named the same as your domain name. In this folder, you'll find the wp-content folder.
- Log in to your server via FTP.
- Navigate to your website directory.
- Delete the wp-content folder since there is currently no content within it.
- Locate your backed-up WordPress files on your computer.
- Upload only the wp-content folder.
Extracting on the server via SSH
You can also upload the .zip file to your server and extract it via SSH. This may be a better option if your wp-content folder is very large.
- Log in to your server via FTP.
- Upload the .zip file to your website directory.
- Log in to your server via SSH.
-
Navigate to your website directory:
[server]$ cd ~/example.com
-
Delete the current wp-content directory:
[server]$ rm -rf wp-content
-
Extract the file contents. Replace wp-content.zip with the actual file name:
[server]$ unzip wp-content.zip
This extracts all of the files into a new directory, which is named the same as your domain.
-
Move the wp-content folder from the newly extracted directory into your website directory:
[server]$ mv example.com/wp-content
-
Run the following to view all of the files:
[server]$ ls -la
You should see your wp-content folder along with all of the other WordPress files.
-
Delete the newly extracted directory:
[server]$ rm -rf example.com

Update the table prefix
Update the wp-config.php file to use the table prefix of the new database you just uploaded. You can view the table prefix in phpMyAdmin. It is the first part of every table name. For example:
wp_3zby173r_options
In this case, the table prefix is: wp_3zby173r_. Update this value in the wp-config.php file using an FTP client or SSH.
Changing the website URL
If you're moving your site to a new domain name during your migration, there is one extra step: you must update your database URLs within the imported database to the new URL.
See this article for instructions on updating these URLs using phpMyAdmin or SSH (command line).
Viewing your site and updating DNS
It's recommended you test your new WordPress installation before pointing its DNS to DreamHost. This allows you to confirm how it functions and fix any issues while it continues to load at your current hosting company.
See this article for instructions on viewing your site by updating the hosts file on your computer.
If the site appears as it should, you are ready to point your DNS to Dreamhost. See this article to confirm what DNS records to update at your old hosting company.